Thursday, July 10, 2008

VT 64 preamp

RCA VT-64 or #800 pre amplifier

Introduction

I have been build class A2 amplifier by using RCA VT-64 or #800 tube in the past and with 2-3 design concept that you can see in my previous post. Everytime that I check the output power they always produce only 1-2W before clipping. So I am very confusing with the result. Then oneday I talk to my friend that is very expert in diy tube amp he ask me why don't you using this tube for pre amp may be it will work fine.

I buy his idea , so I plan to using it as pre amp and in the future if I get more tube I will try to make another amp again.

The design

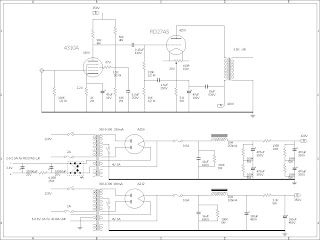
This is very simple pre amp design , I just using LC coupling concept rather than RC because not only to reduce the heating from plate load resister but I will have more gain to this pre amp to drive my amp that using low gain input tube.


Schematic

For power supply I using Ratheon 1641 full wave rectify that are ST shape with 2 cap look like VT-64 , the concept is normal CLC filter and for filarment supply I'm using DC with LM338 to regulate.

Under chassis before I change C coupling and DC filarment to LM338

If you take a look at the volume you will see that it is after the tube to reduce hum that a bit high for DHT transmitting tube like VT-64
Another problem that I found is C coupling , at first I'm using Jupiter 0.47uF 600V that I think that it can use with this design because I'm using plate voltage around 525V , but the real life the Jupiter is failed so I need twice votage support of C coupling , I change to Mundolf that can support to 1200V , I've only 1uF value so I use this one and it's OK now.

The sound

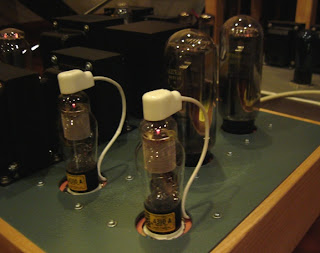
picture of VT-64 and 1641 tube

I'm compare to my other pre amp such as #26 , Ce also my friend 300B preamp , I found that VT-64 pre amp produce more detailed and clear sound compare to #26 and Ce , but when compare with 300B I found that the high and low of this pre amp are better than 300B also detailed is better and sound more clear and natural than 300B but 300B is more open of the sound than this pre amp and on Ce and 300B is more smooth and relax than Vt-64. But all together I think this pre amp is sound a bit better than 300B or #26 and Ce .

But very sad that this tube is very difficult to find and also too costly to use this tube for pre amp application.

GM70 PP

GM70 PP monoblock
Introduction

In the past , I never intend to build tube amp that using voltage over 1000V because it is very dangerous to deal with high voltage. So I never build tube amp that using tube like 211 , 845 , 833A etc.

But a few month ago I met with my friend who have GM70PP diy amp that he not satisfaction to it and he asking me to modify it for him. After I take a look at that amp , I found that they using the poor design and poor parts also many area are still not secure to use , such as too small wiring cable , small wattage of resister and no breeder and it chassis look not so nice so I decise to re build it to new amp keeping only transformer , socket , connector and some capacitor.

The design

My new design are using Cca for input tube and split phase my Electraprint Autoformer that I success to use with my F2A PP , driver tube is 6V6 both Cca and 6V6 are using Ixys 10M45S CCS chip loading and output are Gm70 using fix bias.
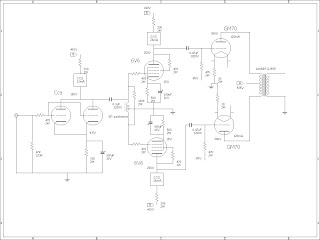
Schematic


PSU

Construction

This is very big and heavy amp , I construct it to monoblock but it's still heavy , it have big Power transformer for high voltage and filarment for GM70 another trabsformer for input and driver tube , 2 big choke and the last it very big output transformer from Lundahl

All the part is using very good quality that I take ie from the previous chassis , connector are WBT for RCA and Binding post , C coupling are Mundolf silver/gold , R almost using Kiwame.

under chassis

I have some problem when I finished it , it have very lound hum , I try many method to reduce the hum , but still there untill I found that the hum is come from GM70 socket the are loosing after I fix it so everything are OK

The sound.

After I test it with my friend high end system , he using Watt/puppy 7 , Audio research reference 3 for pre amp , and CD transport are CEC with Mark levenson DAC , sorry that I forgot the model. I think it sound is very nice , strong and some backup power when playing classic , high is OK , I heard some sound that I think that I never here from SE system that he have ( he also using 300B PSE from KR enterprise ) , only middle that SE is still better but overall it's sound very good but I can't compare too other PP amp that using other tube such as EL34 , 6550 or KT88.

Currently I change the input tube from Siemens Cca to Tung sol 5687 , I think the sound are more better than Cca version , bass is more realistic also high are better too.

Thursday, July 3, 2008

RD27AS SE

RD27AS SE

ที่มา
ผมเป็นคนสนใจหลอดยุโรปมาตั้งแต่ต้น และเริ่มเล่นหลอดใหม่ๆด้วยมีความสนวจประวัติศาสตร์ของเยอรมันโดยเฉพาะเทคโนโลยี่ในยุคสงครามโลกครั้งที่สองเป็นทุนอยู่แล้ว ประกอบกับคิดว่าหลอดอเมริกันเบอร์ยอดนิยมทั้งหลายเพื่อนๆก็เล่นกันเยอะแยะอยากฟังเมื่อไรก็หาฟังได้ไม่ยาก จึงไม่ได้เก็บสะสมและเอามาเล่นเลย ทีนี้ในกลุ่มหลอดยุโรปที่น่าสนใจนักก็มีเบอร์ PX-25 ที่เป็นคู่ต่อกรกับ 300B ของฝั่งอเมริกันเขา ด้วยโครงสร้างที่เป็น DHT ที่สามารถทำแอมป์ได้ประมาณ 7W ใกล้เคียงกับ 300B


หลอด STC4310A กับ Tesla RD27AS

แต่ PX-25 เป็นหลอดในกลุ่มที่แพงมาก หลอดอย่าง Osram , Marconi , Tungsram ราคาจะสูงและหายากผมจึงไม่ได้ซื้อมาเล่นซะที จนไปเจอ Tesla RD27AS อยู่ใน Ebay ไม่มีใครสนใจเพราะอาจไม่รู้จักกัน ผมจึงแอบบิดมาได้ในราคาที่ไม่โหดเกินไปนัก แต่ก็ไม่ใช่ถูกเหมือนได้เปล่า เพราะยังไงก็ตามมันก็ยังมีคนรู้และมาบิดแข่งอยู่ดี
ใน Tesla นี้จะมี PX-25 อยู่ 2 เบอร์ คือ RD25A ซึ่งเหมือน PX-25 เปี๊ยบเป็นหลอดทรงโกลบที่ใช้ datasheet ตัวเดียวกับ PX-25 Osram ได้เลย กับ RD27AS ที่ผมบิดมาซึ่งเป็นทรง tubular และมี plate dissipation กับ V plate ที่สูงกว่า PX-25 ทั่วไปเล็กน้อย แต่โครงสร้างอื่นๆเหมือนกัน ค่า spec ก็ใกล้เคียงกันมาก
วงจร


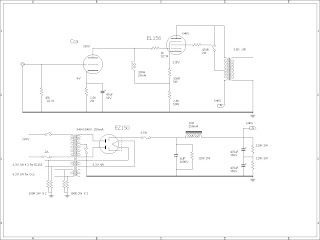
เนื่องจากมันเป็นหลอดที่มี spec สูสีกับ 300B ดังนั้นผมจึงใช้วงจรแบบ 300B ที่โด่งดัง คือ WE91B มันซะเลยจะได้ฟัดกันให้รู้แล้วรู้รอดไปข้างหนึ่ง นั่นคือใช้หลอด drive เป็น STC4310A และวงจรภาคสัญญานเหมือน WE91B modify แต่ภาคจ่ายไฟผมแยกเป็น ภาค power ใช้ AZ50 กับ ภาค drive ใช้ AZ12 แยกชุดกันไปเลย

เป็นรูปก่อนเปลี่ยน C เป็น Obbligato และ R เป็นพวก Riken กับ Caddock ครับ

อุปกรณ์โดยทั่วๆไปใช้ของที่เกรดดีหน่อยเพราะผมตั้งใจเทียบกับ 300B ที่ทำให้พี่ที่รู้จักกัน ดังนั้นพวก C filter ก็ oil ผสม electrolyte โดย oil ใช้ Obbligato และ electrolyte ใช้ Mundolf ส่วน C coupling ใช้ Angela ( Jensen ) พวก R ใช้ปนๆกันทั้ง Audio note tantalum , Riken , Kiwame , Caddock แล้วแต่ตำแหน่งที่ใช้งาน
หม้อแปลง output ถ้าเป็น 3.5K ผมใช้ Hashimoto แต่ถ้าฟัง 5K ผมก็ใช้ Daburu ฟังไปฟังมาผมชอบ Daburu ที่ 5K มากกว่าแฮะ

หม้อแปลง Hasimoto แยกแท่นออกมาจะได้ใช้กับแอมป์หลายๆตัว

เรื่องเสียงครับ ผมว่าเสียงดีพอสมควรเลยครับ นั่งฟังกับน้องที่เล่นเครื่องเสียง commercial มาเยอะหน่อย แกบอกว่า รายละเอียดเสียงดีมาก จังหวะของดนตรี ช่องไฟมันดูดี ( โอโห ฟังขนาดช่องไฟของดนตรี ) และมันนุ่มนวลมาก ไม่รู้ไปเทียบกับแอมป์อะไร แต่ในส่วนตัวผม ผมก็ชอบมันมากมันฟังเพลงร้องได้ดี เพลง jazz ก็ OK ซึ่งผมก็เลยใช้มันเป็นแอมป์หลักของผม ฟังบ่อยกว่าตัวอื่นอยู่เสมอครับ

EL156 DRD drive


ที่มา
หลังจากทำ EL156SE มาและได้แก้ไขวงจรไปหลายครั้ง ผมก็ยังรู้สึกหงุดหงิดใจ เพราะรู้สึกว่ามันยังไม่ลงตัวเท่าใดนัก เพราะด้วยความที่หม้อแปลงไฟทำมาสำหรับ choke input แต่เกิดปัญหาโช๊คสั่นตอนใช้งาน ผมลองทั้งใช้ C input แต่ใช้ R drop ไฟขนานใหญ่จนแท่นร้อนฉึ่ง หรือใช้วิธี semi choke input โดยใส่ C ค่าเล็กเข้าไปก่อนโช๊ค ซึ่งถึงแม้จะใช้ได้แต่ก็รู้สึกแปลกๆทุกครั้งที่ฟัง
จนมาคิดได้ว่าหากใช้ C input และไฟมันสูงไปมาก ทำไมเราไม่ทำวงจรแบบ direct coupling มันซะเลยจะได้ใช้ประโยชน์ที่ไฟมันสูงดีนัก ว่าแล้วก็ออกแบบวงจรใหม่เป็น direct coupling มันซะเลย แต่ไหนๆก็จะใช้ direct coupling แล้ว จะทำแบบธรรมดามันก็ไม่สนุก ดังนั้นผมจึงใช้วงจรแบบ Direct reactance drive หรือ DRD มันซะเลย
วงจร DRD นี้เป็นนวัตกรรมที่คิดโดย Mr.Jack แห่ง Electra print พื้นฐานวงจรมันจะคล้ายๆวงจร direct coupling แบบ Loftin-White โดยในวงจรจะใช้ ไฟจาก cathode ของหลอด power ไปจ่ายกลับให้กับ plate หลอด drive อ่านแล้วงงๆก็ดูรูปวงจรกันดีกว่า

วงจร


อย่างที่กล่าวไว้ว่าวงจรผมใช้ concept DRD ของ Electra print ดังนั้นรายละเอียดต่างๆก็สามารถหาอ่านได้จาก web site ของเขา แต่หลักๆผมใช้ หลอด power เป็น EL156 และใช้หลอด Cca เป็น driver โดยใช้ plate choke Electra print 100H 20mA มาเป็น load ให้กับหลอด drive


สำหรับอุปกรณ์โดยทั่วไปก็ใช้จากเครื่องเดิมมาปรับปรุง แต่ในการทำวงจรแบบ DRD มีความยุ่งยากพอสมควร เพราะคำนวน R ในตำแหน่งต่างๆยากมาก แถมยังหาค่าที่ตรงๆและเป็น R ที่มีคุณภาพดีๆได้ยาก กว่าจะเสร็จแย่เลย แต่เมื่อเสร็จแล้วก็ OK เลยครับ แจ๋วมากเลยครับวงจรแบบนี้ มันใช้งานได้ดี แม้ว่า R cathode มันจะร้อนฉิ่งเหมือนเดิม แต่มันได้ความรู้สึกดีว่ามันได้ใช้งานไม่ใช่เอา R มา drop ไฟเผาพลังงานทิ้งไปซะเปล่าๆ
เสียงที่ได้ผมรู้สึกว่ามันดีกว่าเดิมครับ ผมรู้สึกได้ว่าความกว้างของเสียงคือแหลมไปไกลและเบสลงลึกกว่าเดิม ผมว่ามันลงตัวกว่าเดิมมาก ผมชอบและคงไม่เปลี่ยนมันอีกแล้วครับ
มีข้อสังเกตบางส่วนของวงจรแบบ DRD คือ จริงๆแล้วหลอด drive มันควรจะเป็นเบอร์ที่เหมาะสมคือมี distiortion เท่าที่ Mr.Jack แกคิดไว้ว่ามันจะมา cancel noise กับหลอด power ได้พอดี แต่ผมดันใช้ Cca ซึ่งผมมีอยู่แล้ว และผมก็ไม่แน่ใจว่ามันจะดีในการใช้งานกับวงจรนี้หรือไม่ และเมื่อผมใช้ ultra path เสียงฮัมก็ดังมาก เพราะเดิมวงจรออกแบบใช้กับพวก DHT ที่เกนน้อย แต่ผมดันเอามาใช้กับ beam pentode ที่เกนมันเยอะมันเลยขยายสัญญานรบกวนเข้าไปที่หลอดโดยตรงเมื่อใช้ ultra path แต่ใช้ C cathode bypass ธรรมดาก็ไม่เป็นไรไม่ฮัม และในการทำ DRD ต้องอย่าลืมยกไฟใส้หลอด power ด้วยนะครับไม่งั้นมันอาจอายุสั้นได้ครับ

GM70 PP monoblock


ที่มา

เดิมตั้งแต่มา diy แอมป์หลอดเล่นนั้น ผมไม่มีความตั้งใจที่จะเล่นหลอดใหญ่ๆใช้ไฟเกิน 1000V เลย ด้วยความกลัวตายนั่นเองครับ ดังนั้นหลอดพวก 211 ,845 อะไรพวกนี้จึงไม่เคยทำกับเขา แต่มาวันนึงหลังจากที่ผมได้ทำแอมป์ 300B SE ให้พี่ที่สนิทกัน ผมไปฟังเพลงที่บ้านแก ก็เหลือบไปเห็นกองผ้าอยู่กองนึงกองอยู่ในห้องฟังเพลง ก็เลยถามที่เขาว่ามันคือกองอะไร พอพี่เขาไปเปิดให้ดูจึงเห็นแอมป์ GM70 PP แบบ monoblock 2 เครื่องวางทิ้งไว้อยู่ ไม่ได้ใช้งาน จึงถามพี่เขาไปว่าทำไมไม่ได้ใช้งาน แกเลยบอกว่ายังไม่ค่อยพอใจเสียงมันนัก ประกอบกับแท่นมีการตัดเจาะเพราะคงแก้ไขมาหลายครั้งจึงไม่สวยงาม แกเลยวานให้ผมช่วยปรับปรุงให้

ผมดูดโหวงเฮ้ง แล้วการจะปรับปรุงให้ดีที่สุดคือการรื้อทำใหม่นั่นเอง ดังนั้นเพื่อความมันส์ ผมจึงอาสารับทำมันขึ้นมาใหม่ทั้งหมดครับ


วงจร


วงจรภาคสัญญาณ
วงจรภาคจ่ายไฟ


เดิมแอมป์ตัวนี้ใช้หลอด 5687 เป็น input และใช้ 12AX7 เป็น phase splitter ( เอหรือสลับกัน ผมจำไม่ได้แล้วเพราะขี้เกียจไล่วงจร ใช้ดูเบอร์เอาจากหลอดที่มันเสียบอยู่ ) อุปกรณ์โดยทั่วไปก็ใช้แต่ของดีๆทั้งสิ้นยกเว้น R และ C ในเครื่องเนื่องจากมันคงถูกแก้ไขวงจรมาบ่อยคนทำเดิมเลยหยิบเอาที่มีที่ใกล้ตัวมาใช้ไปก่อน ผมเลยเปลี่ยนวงจรใหม่ซะเป็น ใช้หลอด Cca ที่แกก็มีอยู่อีกแล้วเป็น input แล้วใช้ autoformer ของ Electra print เป็น phase splitter จากนั้นเข้าหลอด 6V6 เป็น driver ก่อนเข้า GM70 เป็น output อีกทีหนึ่ง ดูวงจรน่าจะเข้าใจง่ายกว่านะครับ


การ bias Cca และ 6V6 ใช้ CCS 10M45S load ซะเพื่อความง่ายในการ set จุดทำงาน และที่ต้องใช้ 6V6 ก็เพราะมันถูกบังคับด้วยหม้อแปลงภาคจ่ายไฟเดิมมันจ่ายไฟได้แค่ 300V กว่านิดๆเอง ถ้ามันซัก 500V ผมคงมีหลอดเบอร์อื่นให้เลือกเล่นได้เยอะ ไม่อยากไปแก้ไขอุปกรณ์อะไรมากครับ เพราะเท่าที่เอามาใช้ได้ก็แค่หม้อแปลงไฟ โช๊ค และ output กับ C บางตัวนอกนั้นต้องใช้ใหม่หมดเลยครับ


ตอนทำมันยากมาเพราะหม้อแปลงมันเยอะหนักมากๆทำไปบ่นไป เพราะมันยกไปมาลำบากปวดหลังมากเลย และโดยเฉพาะมันดันมีปัญหา socket GM70 ไม่ค่อยแน่น มันเลยฮัมมาก ผมงมโข่งหาสาเหตุนานมากกว่าจะเจอต้องยกไปยกมาหลายรอบมากๆ พอเจอแล้วแทบจะเขกกระบาลตัวเอง

ภาคจ่ายไฟสำหรับ GM70 ก็ใช้ diode ธรรมดา แต่ไฟมันสูงประมาณ 1000V เลยต้องใช้ C มาอนุกรมกันกลายๆตัว ส่วนภาค input driver ใช้หลอด GZ34 เป็น rectify และผม set GM70 ให้ทำงานแบบ fixed bias ซึ่งเดิมหม้อแปลงไฟดันพันมาที่ 45V เลยต้องทำ voltage doubler ให้ได้ 90V เดี๋ยวดูวงจรแล้วจะงงครับ

ทำออกมาแล้วผมคาดว่าจะได้กำลังประมาณ 35-40W ซึ่งจริงๆน่าจะได้มากกว่านี้แต่หม้อแปลง Lundahl มันคงได้ไม่มากไปกว่านี้แล้วล่ะครับ แค่ set bias 120 mA กว่าๆ มันก็อิ่มตัวซะแล้ว ฟังๆไปเบสหายเฉยเลย เลยต้อง bias แค่ 100mA ตาม spec หม้อแปลงมัน

เรื่องเสียงครับ ผมใช้ต่อกับ watt/puppy 7 ผมว่าเสียงมันหนาๆหนักๆมีพลังดีครับ รายละเอียดเสียงก็ดี ได้แนวไปอีกแนวที่แตกต่างจาก 300SE ที่ฟังเทียบกัน แต่ผมยังไม่เคยเทียบกับ GM70 SE แบบเจ๋งๆเลย เลยนึกภาพความแตกต่างไม่ออกครับ จะเอาไปเทียบ 300B SE เลยไม่เหมาะนักเพราะมันคนละประเภทกันไปเลย